Adding and modifying targets
This chapter describes adding MySQL database, cluster and ClusterSet targets from the console and with EM CLI, autodiscovery, modifying and removing targets, and associating compliance standards. Topics: 4.1 Target properties · 4.2 Add a target manually · 4.3 Add a target with EM CLI · 4.4 Autodiscovery · 4.5 Modify or remove a target · 4.6 Associate compliance standards · 4.7 Bulk onboarding and migration
4.1 Target properties
Every MySQL target is defined by the same small set of monitoring properties, whichever way you add it. The names in bold are the labels on the console page; the names in parentheses are the property keys EM CLI takes (4.3).
User and Password are credential properties. In the console they appear in the credentials area of the Add Target page; with EM CLI they go in -credentials rather than in -properties.
MySQL Database (ip_mysql_database_beta)
- User (
ip_mysql_database_username): the monitoring account from 2.4, user name only, without the host part. - Password (
ip_mysql_database_password): that account’s password. - Host (default - localhost) (
ip_mysql_database_host): host name or IP address of the MySQL server as the agent host reaches it. Leave it empty only for a socket connection (2.6). Enter a single host here — a MySQL Database target is one server, and the Run EXPLAIN job passes these values as comma-separated arguments; endpoint lists are for Cluster and ClusterSet targets only (see below). - Port (default - 3306) (
ip_mysql_database_port): the server’s listening port. - Unix Socket Path (socket connections) (
ip_mysql_database_socket): full path to the server’s socket file. Local agent only — leave Host empty when you set it. - TLS Mode (disabled / required / verify_ca / verify_identity) (
ip_mysql_database_use_secure): transport security for this target. See 2.5. - Kerberos Configuration File (
ip_mysql_database_kerberos_config): full path to akrb5.confon the agent host, for Kerberos authentication. - License Key (
ip_mysql_database_license): the signed licence key issued for this plug-in, pasted as one line. The console lets you add the target without it, but nothing except availability collects until the key is accepted: theLicensemetric reports the reason (License Requiredfor no key) and raises a CRITICAL incident, and every other metric group on the target reports a collection error —Collection stopped by license status: …— until the status isActive; availability keeps reporting, so the target stays Up rather than Down. Cluster and ClusterSet targets are containers, not licensed targets, and are never stopped. The key is checked entirely on the agent host — nothing is sent to the MySQL server or outside Enterprise Manager — every 15 minutes, and again as soon as the property changes. TheStatuscolumn of theLicensemetric gives the reason a key is not accepted:Invalid Signature(the key was altered),Wrong Plug-in(a key issued for the other edition of this plug-in), orExpired.
MySQL Cluster (ip_mysql_cluster_beta)
The same properties, with the ip_mysql_cluster_ prefix in place of ip_mysql_database_, and two labels that read differently:
- (Router) Host (
ip_mysql_cluster_host) and (Router) Port (ip_mysql_cluster_port): a MySQL Router endpoint, or any member of the cluster — or a comma-separated list of them (members, or two Routers), so the target survives losing one.mysql-a,mysql-b,mysql-cwith Port3306gives every host that port; Port3306,3307,3308pairs them in order; one host with several ports (mysql-c/1830,1831,1832) works too. Any other combination, or an empty entry, is rejected, as is any entry that is not a plain host name, IP address or[IPv6]literal, or a port outside 1–65535, or more than 16 endpoints: the target shows Down and every collection reports the error, rather than guessing. The connection tries the list in order and moves on when a member does not answer, with a connect timeout of 10 seconds for a single endpoint and 15 seconds shared across a list (never less than 5 per attempt); with every member down the driver makes one extra attempt on the first entry before giving up, so budget (N+1) attempts, not N. The target reads cluster-wide state through whichever member it lands on. - User / Password (
ip_mysql_cluster_username,ip_mysql_cluster_password): the monitoring account must carry the grants in 2.4 on the cluster. Created on the primary, it replicates to every member. - TLS Mode, Unix Socket Path and Kerberos Configuration File behave exactly as they do for a MySQL Database target.
MySQL ClusterSet (ip_mysql_clusterset_beta)
The same properties again with the ip_mysql_clusterset_ prefix, plus one that only this type has:
- (Router) Host / (Router) Port (
ip_mysql_clusterset_host,ip_mysql_clusterset_port): the Router endpoint, or a member — or a comma-separated list of members, with the same rules as the Cluster target above. Both the JDBC collections and the MySQL Shell session try the list in order; listing every member of every cluster is the configuration that survives losing any one of them. A MySQL Router port works on both paths with password authentication: the Router forwards the JDBC connections and the MySQL Shell session to the current primary, and the AdminAPI still reports the cluster-wide view, sohealth_sourcereadsADMINAPIbehind a Router exactly as it does on a member. List two Routers (router-1,router-2with Port6446) to survive losing one; with Kerberos, list member endpoints instead (2.2). Availability (theResponsemetric) is Up while any listed endpoint answers. Whether the ClusterSet is healthy is a separate question, answered by theClusterSetHealthmetric from the AdminAPI’s cluster-wide view and never from the member that happened to answer — so a member of a failed cluster answering the connection cannot make the target look healthy, and a failed member cannot make a healthy ClusterSet look Down. The MySQL Shell session itself is bounded by its own process budget, separate from the JDBC connect timeout above: 60 seconds for a single endpoint (30 seconds base plus a fixed 30-second reserve for the AdminAPI’s own status fan-out to every cluster member), plus the list’s per-attempt budget for a list of more than one endpoint (the same 15-seconds-shared/5-second-floor figure), so a longer list is given proportionally more time to try every member before being stopped. - DR Max Tolerated GTID Lag (transactions) (
ip_mysql_clusterset_dr_max_lag): how many transactions the replica cluster may be behind the primary cluster and still count as ready for promotion. Thedr_promotion_readycondition (7.1) evaluates against it.
Note: A ClusterSet target also needs
mysqlshon its agent host (2.2), and in this release its TLS Mode should berequiredordisabled(2.5). With a Kerberos Configuration File set, MySQL Shell authenticates with the agent user’s ticket and needs member endpoints rather than a Router port (2.2).
4.2 Add a target manually
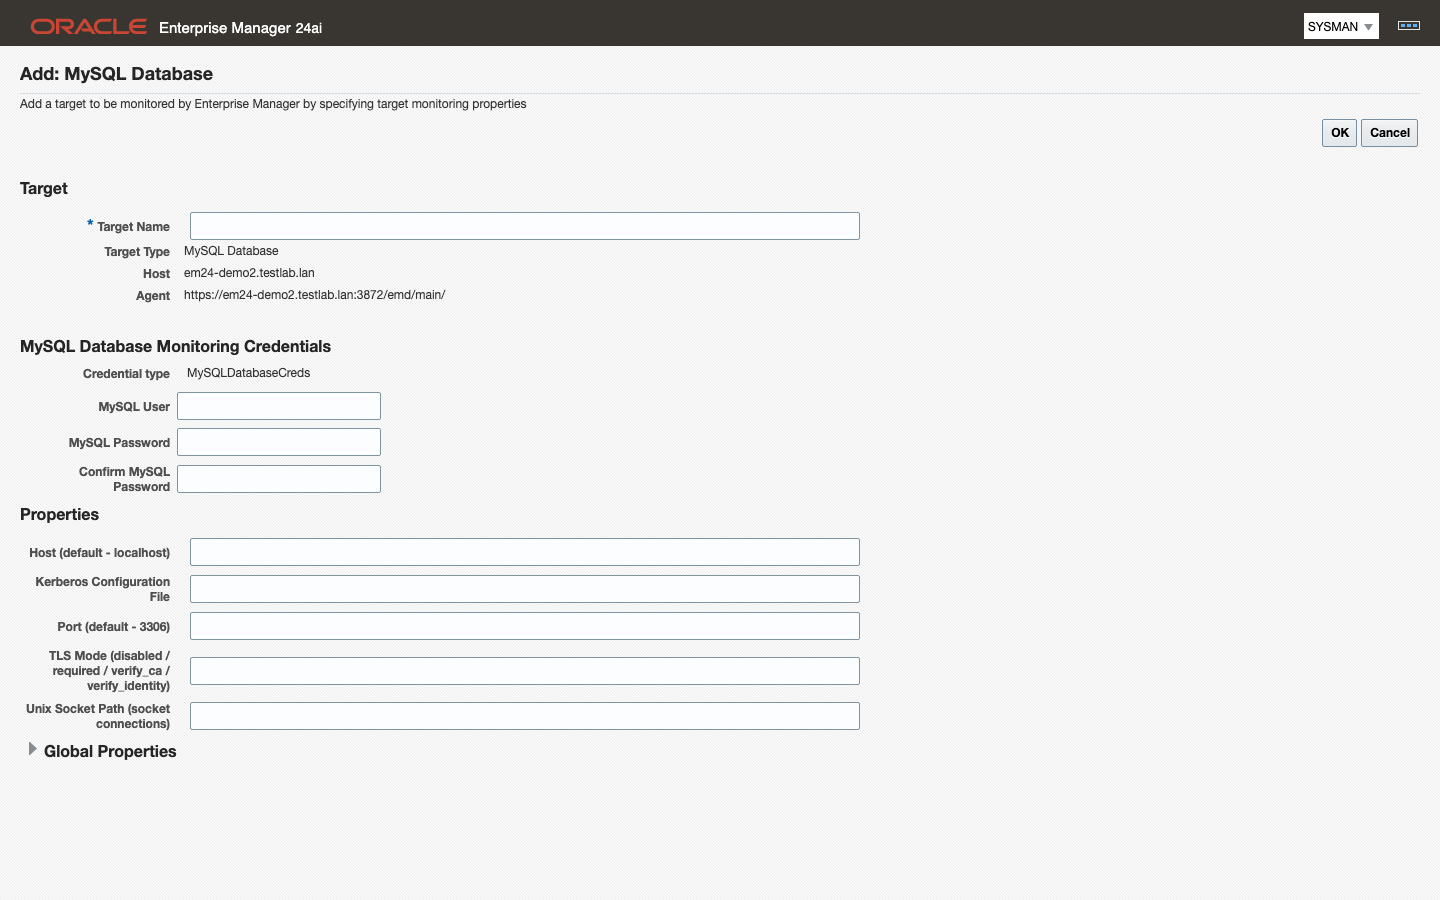 Use this route for a single target, and for any endpoint autodiscovery cannot see (4.4).
- Make sure the plug-in is deployed to the agent that will monitor the target (3.3). Until it is, the MySQL target types are not offered for that agent.
- In the console, choose Setup → Add Target → Add Targets Manually.
- Select Add Targets Declaratively by Specifying Target Monitoring Properties.
- In Target Type, select MySQL Database.
- In Monitoring Agent, select the agent that will run the collections — this is the agent host, not the MySQL server — then click Add Manually.
- Enter a Target Name. This is the display name used throughout the console and the name EM CLI verbs take.
<host>:<port>is the convention autodiscovery uses and it stays readable at scale. - Fill in the monitoring properties from 4.1. At minimum supply User, Password, Host, Port and the License Key, plus TLS Mode if the server requires an encrypted session. A target added without a key comes Up but collects nothing except availability until a key is accepted (4.1).
- Click Test Connection. A failure here is a credential, network or TLS problem; fix it before you continue, because a target added with wrong properties is added Down.
- Click OK to create the target.
Repeat for MySQL Cluster and MySQL ClusterSet, choosing that target type in step 4 and filling in the properties listed for it in 4.1.
The target appears in the console within a couple of minutes, and its metric groups populate on their own schedules.
Note: Cluster and ClusterSet targets are independent of the MySQL Database targets for the same servers. You can add either without the other, and adding a cluster target does not create database targets for its members.
4.3 Add a target with EM CLI
EM CLI creates the same target as the console and is the practical route once you are onboarding more than a handful of servers.
add_target takes the display name, the target type, the agent host, and the monitoring properties split across two options:
| Console target type | -type value |
Property prefix |
|---|---|---|
| MySQL Database | ip_mysql_database_beta |
ip_mysql_database_ |
| MySQL Cluster | ip_mysql_cluster_beta |
ip_mysql_cluster_ |
| MySQL ClusterSet | ip_mysql_clusterset_beta |
ip_mysql_clusterset_ |
| Console field | Key (<prefix> from the table above) |
Option |
|---|---|---|
| User | <prefix>username |
-credentials |
| Password | <prefix>password |
-credentials |
| Host / (Router) Host | <prefix>host |
-properties |
| Port / (Router) Port | <prefix>port |
-properties |
| Unix Socket Path | <prefix>socket |
-properties |
| TLS Mode | <prefix>use_secure |
-properties |
| Kerberos Configuration File | <prefix>kerberos_config |
-properties |
| License Key (MySQL Database only) | ip_mysql_database_license |
-properties |
| DR Max Tolerated GTID Lag (ClusterSet only) | ip_mysql_clusterset_dr_max_lag |
-properties |
Note: on Cluster and ClusterSet targets,
<prefix>hostand<prefix>portaccept the comma-separated lists described in 4.1. Commas inside a value pass straight through EM CLI; the;between properties and the:after each name are unchanged.
Both options take key:value pairs separated by ;. Log in first with emcli login -username=<em user>.
A MySQL Database target:
emcli add_target -name="mysql84-prod-01" -type="ip_mysql_database_beta" \
  -host="agent-host.example.com" \
  -properties="ip_mysql_database_host:10.0.0.21;ip_mysql_database_port:3306;ip_mysql_database_use_secure:required;ip_mysql_database_license:<licence key>" \
  -credentials="ip_mysql_database_username:em_monitoring;ip_mysql_database_password:<password>"
A MySQL Cluster target, pointed at a Router endpoint:
emcli add_target -name="mysql84-prod-cluster" -type="ip_mysql_cluster_beta" \
  -host="agent-host.example.com" \
  -properties="ip_mysql_cluster_host:10.0.0.30;ip_mysql_cluster_port:6446;ip_mysql_cluster_use_secure:required" \
  -credentials="ip_mysql_cluster_username:em_monitoring;ip_mysql_cluster_password:<password>"
A MySQL ClusterSet target, which adds the DR lag tolerance:
emcli add_target -name="mysql84-prod-clusterset" -type="ip_mysql_clusterset_beta" \
  -host="agent-host.example.com" \
  -properties="ip_mysql_clusterset_host:10.0.0.30;ip_mysql_clusterset_port:6446;ip_mysql_clusterset_use_secure:required;ip_mysql_clusterset_dr_max_lag:100" \
  -credentials="ip_mysql_clusterset_username:em_monitoring;ip_mysql_clusterset_password:<password>"
The same ClusterSet behind two MySQL Routers, so that losing one Router does not take the target Down (the list rules are in 4.1; password authentication, because Kerberos does not pass through Router):
emcli add_target -name="mysql84-prod-clusterset" -type="ip_mysql_clusterset_beta" \
  -host="agent-host.example.com" \
  -properties="ip_mysql_clusterset_host:router-1.example.com,router-2.example.com;ip_mysql_clusterset_port:6446;ip_mysql_clusterset_use_secure:required;ip_mysql_clusterset_dr_max_lag:100" \
  -credentials="ip_mysql_clusterset_username:em_monitoring;ip_mysql_clusterset_password:<password>"
Confirm the target was created:
emcli get_targets -targets="mysql84-prod-01:ip_mysql_database_beta"
Note:
-hostnames the agent host that will monitor the target. The MySQL endpoint goes in the<prefix>hostproperty, and the two are usually different — the same agent host appears in every command when one agent monitors many servers.
Note: If a value has to contain
;or:, override the separators rather than escaping them. Runemcli help add_targetfor the-separatorand-subseparatorsyntax.
4.4 Autodiscovery
Enterprise Manager can propose MySQL Database targets for you on hosts it already monitors.
The plug-in’s agent-side discovery detects every listening mysqld process on a monitored agent host and proposes one target per instance, named <host>:<port>. The name carries no process ID, so it is stable across restarts, and several instances on one host are proposed separately by their listening ports.
Agent-side discovery has to be enabled for the host before anything appears: under Setup → Add Target → Configure Auto Discovery, enable the MySQL discovery module on each host you want scanned and set its schedule.
To adopt a proposed target:
- Choose Setup → Add Target → Auto Discovery Results.
- Select the proposed MySQL Database target and click Promote.
- Supply the monitoring credentials (2.4) and the remaining properties from 4.1. TLS Mode in particular cannot be discovered — set it explicitly (2.5).
- Click Promote to finish. The target comes Up; it starts collecting once its License Key property is set (discovery does not supply one — open the target, Target Setup → Monitoring Configuration, and paste the key; see 4.1).
Note: Managed-cloud MySQL — Amazon RDS and Aurora, Google Cloud SQL, Azure Database for MySQL and their equivalents — has no host process for an agent to see, so it is never autodiscovered. Add those endpoints manually (4.2 or 4.3), using the service endpoint as Host and its port.
Amazon RDS for MySQL — certified 2026-09-09 on RDS MySQL 8.4.11. The standard least-privilege monitoring user (2.4) collects every metric group with zero collection errors; nothing RDS-specific is needed beyond a security-group rule that admits the agent host on the endpoint port. What you will see that differs from a self-managed server, none of it a defect:
- Backups are invisible to the server. RDS snapshots are not MySQL Enterprise Backup or XtraBackup runs, so
BackupHistoryhas no rows andBackupStatusreports both tools absent with no backup age — the backup thresholds stay silent. Watch RDS backups in AWS.- The AWS-managed accounts trip the account rules.
rdsadmin@localhost(ALL PRIVILEGES,auth_socket) and therds_superuser_rolerole — and the master user through that role — violate the security standard’s SUPER / GRANT OPTION / PROCESS /mysql-schema-write / wildcard-host rules. You cannot change those accounts; treat the violations as the documented baseline for RDS or exclude the standard’s account rules for RDS targets.- RDS defaults fire configuration rules that a hardened self-managed server would pass: redo/undo and binary-log encryption off, no keyring,
require_secure_transportoff (8.4 family default), password validation not installed,local_infileon,sql_modenot strict — and binary logging itself is off while automated backups are disabled (backup retention 0), which also fires the binary-logging rule. Change what the parameter group and backup settings allow; accept the rest as the managed baseline.- Replica-side, Enterprise-only and lock-wait groups are empty on a stand-alone RDS instance, as on any server without a replica, the audit-log or firewall components, or lock contention — no rows, no errors. Table statistics appear once user tables see I/O.
- TLS: RDS MySQL 8.4 accepts plain and TLS connections by default; setting TLS Mode to
required(4.1) works against the RDS endpoint. Verifying the RDS certificate chain (TLS Modeverify_ca/verify_identity) needs the truststore credential set and is not yet certified.- Aurora MySQL, Cloud SQL and Azure Database for MySQL are expected to behave the same way but have not been run through the certification matrix yet.
MySQL Cluster and MySQL ClusterSet targets are not autodiscovered either. They are added against an endpoint you choose, so create them manually.
4.5 Modify or remove a target
Monitoring properties can be changed at any time; the change applies from the next collection.
To change a target’s properties in the console:
- From the target’s home page, choose the target-type menu → Target Setup → Monitoring Configuration.
- Edit the properties (4.1) and click OK.
Editing credentials, host, port or TLS Mode is the normal way to move a target to a new endpoint or to turn encryption on. You do not need to remove and re-add the target for any of them.
To remove a target, choose the target-type menu → Target Setup → Remove Target and confirm.
The EM CLI equivalents:
emcli modify_target -name="mysql84-prod-01" -type="ip_mysql_database_beta" \
  -properties="ip_mysql_database_port:3307" -on_agent
emcli delete_target -name="mysql84-prod-01" -type="ip_mysql_database_beta"
-on_agent pushes the change to the agent immediately instead of waiting for the next agent resynchronization.
Note: Removing a target removes its collected metric history and its compliance associations with it. A target re-added under the same name starts both over, so prefer editing a target’s properties to deleting and recreating it.
4.6 Associate compliance standards
Adding a target does not associate compliance standards with it — neither the console wizard nor emcli add_target carries an association, so a new target has no compliance evaluations until you associate the standards.
The plug-in ships five standards for ip_mysql_database_beta targets, collected in one framework:
| Standard | Internal name |
|---|---|
| MySQL Administration Standard | xmys_administration_standard |
| MySQL Performance Standard | xmys_performance_standard |
| MySQL Replication Standard | xmys_replication_standard |
| MySQL Schema Standard | xmys_schema_standard |
| MySQL Security Standard | xmys_security_standard |
All five are authored by INTEGRATION_PLUMBERS at version 1. Chapter 9 describes the framework and every rule in it.
From the console:
- Choose Enterprise → Compliance → Library.
- On the Compliance Frameworks tab, select MySQL Framework (Integration Plumbers). To associate a single standard instead, switch to the Compliance Standards tab and select one of the five.
- Click Associate Targets.
- Add the MySQL Database targets you want evaluated, then click OK and confirm.
With EM CLI, associate one standard at a time:
emcli associate_cs_targets -name="xmys_security_standard" -version=1 \
      -author=INTEGRATION_PLUMBERS -target_list="mysql84-prod-01"
Repeat the command for each of the five internal names you want evaluated on that target.
Note: The two options take different name forms.
-nametakes the standard’s internal name from the table above;-target_listtakes the target display name alone.
Results appear on the target’s compliance pages once a configuration collection has run against the newly associated standards. See 9.2 for reading them.
4.7 Bulk onboarding and migration
For more than a handful of targets — and for moving an estate off the Oracle MySQL plug-in or the beta — use the
mysql-onboard.sh script (download, example inventory).
It exports the existing targets to a CSV, creates the replacement GA plug-in targets side by side with
add_target / modify_target -on_agent, verifies Up and licence, associates the standards from 4.6, and retires
the sources on request. The full sequence, the review flags and the threshold worksheet are in the
migration chapter.